Introduction to MakeClothes
MakeClothes is used to create clothes for MakeHuman characters. When you work with hm08 meshes, you can also use MPFB2 to create clothes. In case you work with MakeHuman II and use a different mesh, MakeClothes is needed. A material editor for glTF-like materials is included, it is available when MakeClothes is switched to MakeHuman II.
The term “clothes” is not really correct, the program creates any kind of mesh which can be used for a character generated by MakeHuman. This also includes hair and different tongue or a new topology for the skin. To use MakeClothes in Blender knowledge of Blender itself is needed.
Notation
To understand the process, a short summary of terms used in MakeHuman I and II:
-
base mesh and helper mesh: The base mesh is the standard body mesh (“hm08”) including a helper-mesh used in MakeHuman. A base mesh for MakeHuman II can also be a different mesh, since it is not necessarily a human it is called a base character.
-
proxies: in a way all meshes projected on the body are proxies. Do differentiate between a piece of cloth and an alternative mesh for the skin, the alternative mesh is called a topology.
-
topologies: special case for a proxy used as a mesh for the skin. Typically used for e.g. a different resolution or to add genitals.
-
clothes: clothes will be all meshes MakeClothes is able to create. Hair and body proxies included.
-
posing: the standard “unposed” base mesh is presented in an A-Pose. Other poses are T-Pose or a pose which is user generated. Typically these poses are created with the standard skeleton. Shapekeys can be used as a special pose too.
-
weighting: when a character is posed the skin but also the clothes should follow the bones. So weights are added to each vertex. These weights determine how much a bone will be followed. MakeClothes uses a similar construction, since the clothes follow vertices on the helper or base mesh.
When you work with MakeClothes, a few base meshes for “hm08” are added to the plugin.
Limits
Makeclothes has certain limits according to the internal structure of MakeHuman I and II
-
In case of MakeHuman I the mesh for the clothes can either be done with quads or with triangles. No mixture allowed. Advantage for quads is a smoother design with a later usage of subdivision surface algorithm (smoothing). Triangles are normally used for e.g. sculpting or when you work with 3rd party meshes. MakeHuman II also works with other polygon meshes.
-
only one material for one item of clothing is allowed in MakeHuman
-
each vertex of an item of clothing uses 3 vertices on base mesh or helper to find its position according to the base character created in MakeHuman
-
each vertex of an item of clothing needs to be in one (and only one) vertex group. A group of the same name must be created on the base character
-
it is possible to create more than one item of clothing with one base character in one blend file.
-
only one base character (human) is allowed when clothes are created. So only one object is “marked as human”. However, if you need more than one base mesh, all others can be marked as clothes
How to load a base character/human
MakeHuman I uses a mesh called hm08. Makeclothes can also work with different base meshes for MakeHuman II.
To create clothes on a standard hm08 base mesh you can create them directly on the body or on the helper mesh. For underwear the nude body is best choice, but for a coat the helper mesh will be used. A good method for e.g. a skirt or coat is to design the piece of cloth on the nude body and then use the helper mesh for weighting in the end.
There are currently a few possibilities to load a standard base mesh. Since MPFB 2 also includes the functionality of MakeClothes, only the loading of the predefined human is explained.
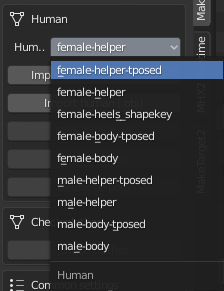
MakeClothes contains 2 Blend-files which are placed in the “humans” sub-directory of the plugin (male.blend and female.blend). When MakeClothes starts, these blend-files are scanned once and names of the objects starting with “mh_” are presented in a menu. To work with it, select a mesh and press “Import predefined human” button.
In case of a helper mesh, the parts of the mesh are assigned to different vertex-groups to allow an easy selection and use different colors.
After the mesh is loaded these buttons disappear, because one human is already loaded. The loaded mesh is automatically marked as a human. To load another human either delete the human or mark your human as clothes.
To use a base character to be used in MakeHuman II, “Use MakeHuman version II” must be selected, then change the Base accordingly. This character must be loaded with blender (e.g. by appending it from a different file). Then it must be marked as basis.
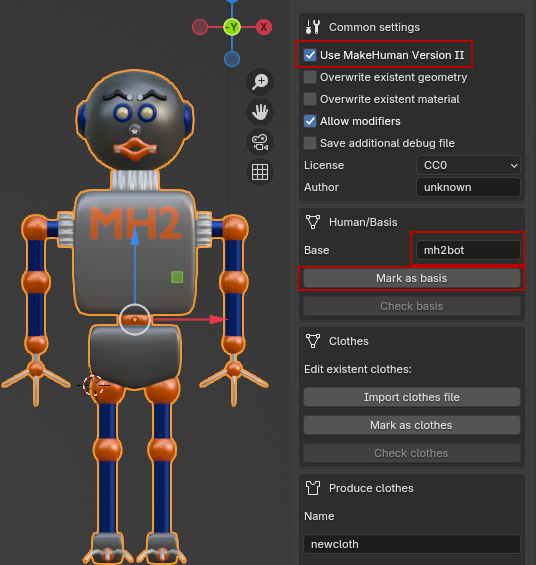
A configuration file of this basis must be available in data folder of MakeClothes, in this case it is “mh2bot.config”. The configuration file supports the current dimensions of the mesh and also groups for a helper.
- Delete helpers
If a mesh is loaded and helpers are not needed, the helpers can be deleted. In this case a vertex-group “body” is expected, all vertices belonging to other groups are deleted. If body is not available, nothing will be done. This only works for hm08 base mesh at the moment.
Tell MakeClothes the type of the object
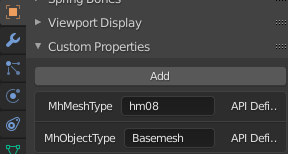
To create clothes, one object must be marked as basis or human and at least one as clothes. If you work with more than one basis, all others must be marked as clothes temporarily. When you mark one object as basis a previously marked basis will automatically be marked as clothes. The custom properties of the object will hold this information.
Create simple clothes (extract from helper)
If a helper mesh is available it is possible to use this helper as a basis for the clothes. Especially for beginners (but also for the advanced for a good weighting) this could be helpful. Of course this only works for the hm08 base mesh at the moment.
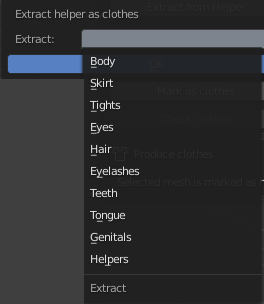
The normal way would be to extract either “Tights” or “Skirt”. Extract means that a copy of a helper part is prepared for your work. The second step would then be to modify this geometry for your own purposes.
Assign vertex-groups
Vertex-groups are a number of vertices of a mesh forming a group with vertex-group name. These groups are used to determine relations between e.g. vertices on the body and vertices on an item of clothing. The simplest way would be:
- create a group “clothing” on the human (or base character)
- assign all vertices of the base to this group
- create a group “clothing” on your item of clothing
- assign all vertices of the item of clothing to this group
This might work, but it is not a good way. There are many risks.
So here are examples from some of the assets I did: Create vertex-groups
Test the human mesh or base character
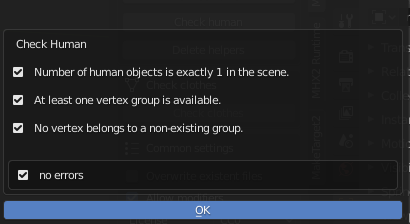
The hm08 human loaded from the selection should not have problems. Nevertheless there is a small test available to check the basis. This test is also automatically done when clothes are created.
- the number of humans or base characters must be one
- there must be one vertex group on the basis
- no vertex belongs to an non-existing group
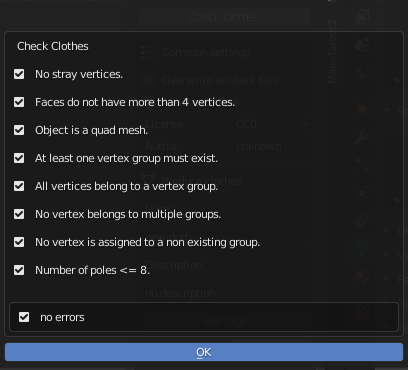
Test the clothes
Clothes need a bit more testing.
-
clothes should not have stray geometry. These are single vertices or edges. If this problem appears, change into edit mode. The vertices are pre-selected. Simply delete them or change geometry otherwise.
-
MakeHuman I only: maximum number of vertices per face is 4. If you have more than this, these faces are selected and must be changed.
-
MakeHuman I only: clothes can be quad or triangle meshes. A mixture is not allowed. The process assumes a mesh type and selects the faces to be changed.
-
the process tests if at least one vertex group is available
-
all vertices must belong to one vertex group. Vertices belonging to no group are selected and can be changed in edit mode.
-
all vertices must belong to only one vertex group. Vertices belonging to more than one group are selected and can be changed in edit mode.
-
no vertex belongs to an non-existing group
-
a test is done, how many edges belong to one vertex. Typically quad meshes with a low pole-count will have better geometric qualities. This is only a warning. The vertices with more than 8 neighbor vertices will be selected and can be changed in edit mode.
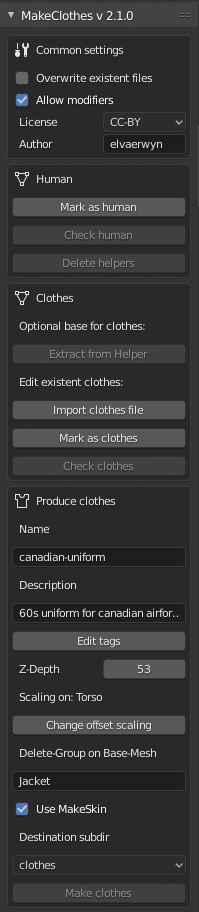
Common settings
The common settings will provide the license and the name of the author, which will be used for all the clothes and materials generated with this file.
-
Use MakeHuman Version II is switched off. If you switch it on, the data folder should change and one can enter different base meshes. The test for triangles and quads is no longer executed and a material editor is available.
-
Overwrite existing geometry is switched off. The name of the item of clothing is used as a filename. If it is necessary to overwrite existing geomerty files, the box must be marked. Since Blender can overwrite existent MakeHuman clothes, this option may avoid accidentally overwriting files.
-
Overwrite existing material is switched off. The name of the item of clothing is used as a filename. If it is necessary to overwrite existing material file, the box must be marked. Often a material file is already in a final state, but the geometry needs to be changed.
-
Modifiers are allowed. Typically the mirror modifier may make sense. Be careful with e.g. subdivision surface, because it may produce a huge number of vertices. When the clothes should be designed with subdivision surface but created without, switch off “Allow Modifiers”
-
Save additional debug file is switched off. If one switches it on, a debug file is written when creating clothes.
Produce clothes
The main features of creating clothes are:
-
name: this is the name of the item of clothing, also the filename
-
comment: a short optional description
-
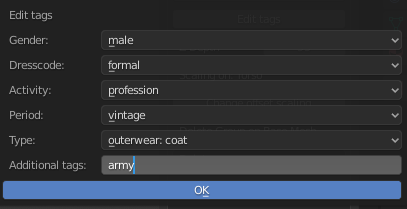
tags: a list of predefined and own tags as a search criteria for MakeHuman
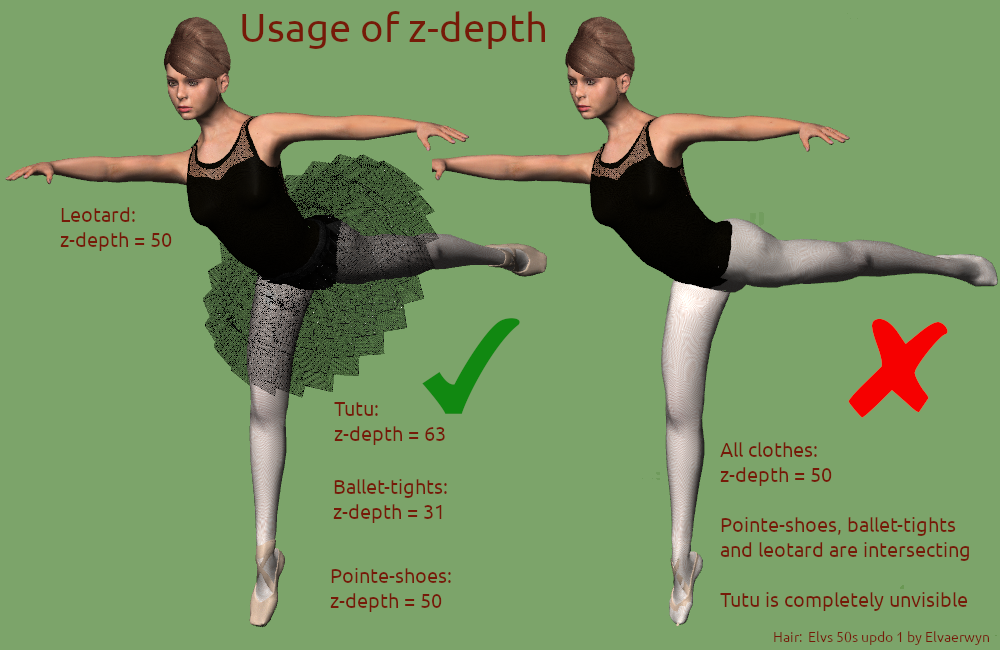
- zdepth: determines the order of clothes. Lower values are used for clothes near the body, higher values for parts far away. This will be used to hide clothes near the body. A rule of thumb is to start with underwear at 31; normal clothes (pants, t-shirt, shoes) use a default value of 50 and clothes like a coat usually use high values like 63. The following illustration shows the effect for a character equipped with ballet clothes. It also demonstrates what is happening when all values are equal.
-
scaling: select the part of the body which is important for the scaling. Most likely torso for a t-shirt, head for a hat etc.
-
delete-group: it is a good method to delete vertices on the body if clothes are not transparent. This avoids bleeding through, that is, that vertices that should be “inside” suddenly appear outside of the clothes. See: delete-group. All vertices not to be displayed should be selected on the body (not helper) and assigned to a vertex on the human. The name of this group must be inserted in the box. If more than one piece of cloth is created, they all can have a different delete-group on the same human.
Data path MakeHuman I: MakeHuman I usually uses the user Documents folder, inside this folder there is a “makehuman” folder. There is a second method, where a file with one line containing the path is added. This file is called makehuman.conf and is found either in .config (Linux) or in the %LOCALAPPDATA% environment (Windows).
Data path MakeHuman II: MakeHuman II works with a configuration file (JSON). The name is makehuman2.conf. It is either in the .config/makehuman2 folder (Linux) or in %LOCALAPPDATA%/makehuman2 folder (Windows). In case a sandboxed python3 interpreter is used for MakeHuman II, Blender checks for packages named “PythonSoftwareFoundation.Python” and will also find the sandboxed folder, but only if there is only one version of python installed.
-
alternative path: MakeClothes tries to find the data folder of MakeHuman I and II (see above). This method is different for different operating systems. If the data path is not where you want the resulting files, enter an alternative pathname.
-
subdir: the directory inside where the clothes will be created.
Materials
Most of the clothes will need a texture. Before the texture can be used the piece of cloth must be unwrapped. The best way is to create seams in Blender where the real seams are.
Unwrap the clothes in any case. The output of this process is a UV-Map, which will be used to determine the coordinates of each vertex on the texture.
If the simple standard material should not be used for export, a material can be created with MakeClothes as well in the Material Editor as well.
Methods to texture clothes you will find here.
Create the clothes
The last step to create clothes is to select the item of clothing and press produce clothes. The tests “check clothes” and “check human” are processed and also an additional test about matching vertex groups is done. If everything is okay, the clothes can be loaded in MakeHuman.
This is not the documentation of how to model geometries for clothes and not every one will be happy with simple way to copy the helper meshes and create clothes directly.
Methods to model clothes you will find here.
Usage of shape keys and targets, create heels
A special female body with shape keys is added as a predefined mesh to allow creation of heels. For advanced users: Method to create heels.
Importing existing clothes
It is possible to load an existing mhclo-file from the data folder of MakeHuman. It’s best to load the human mesh before, if you want to change geometry. The clothes will also fit to a different body, but in this case they will not look as good as on the body they were made for. But the advantage is that, e.g., clothes created for males can be used as a base for a female version.
When clothes are imported, most of fields are filled in by the process and the delete-group is marked on the human (in case a human is available).
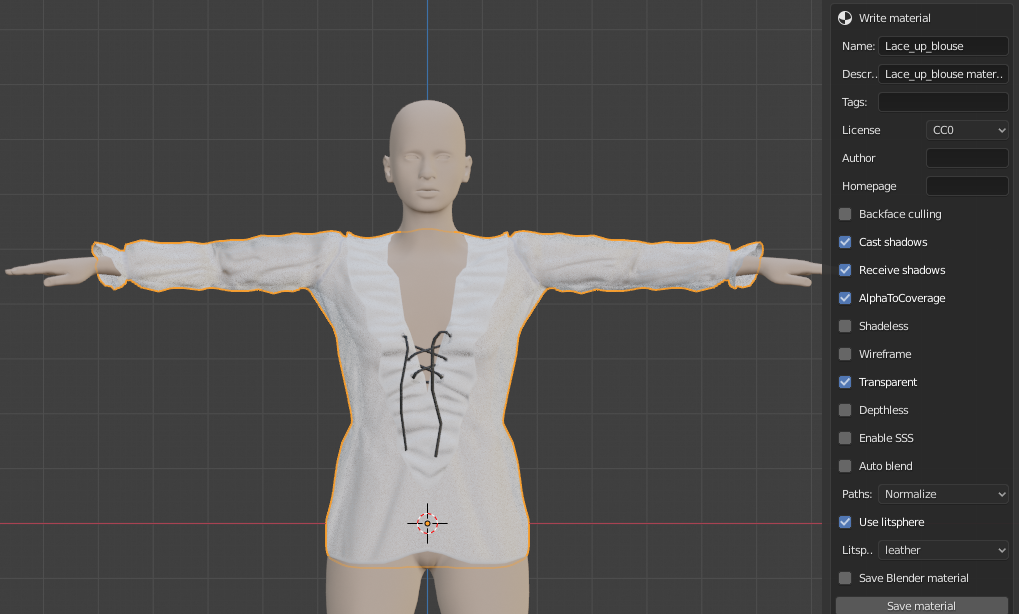
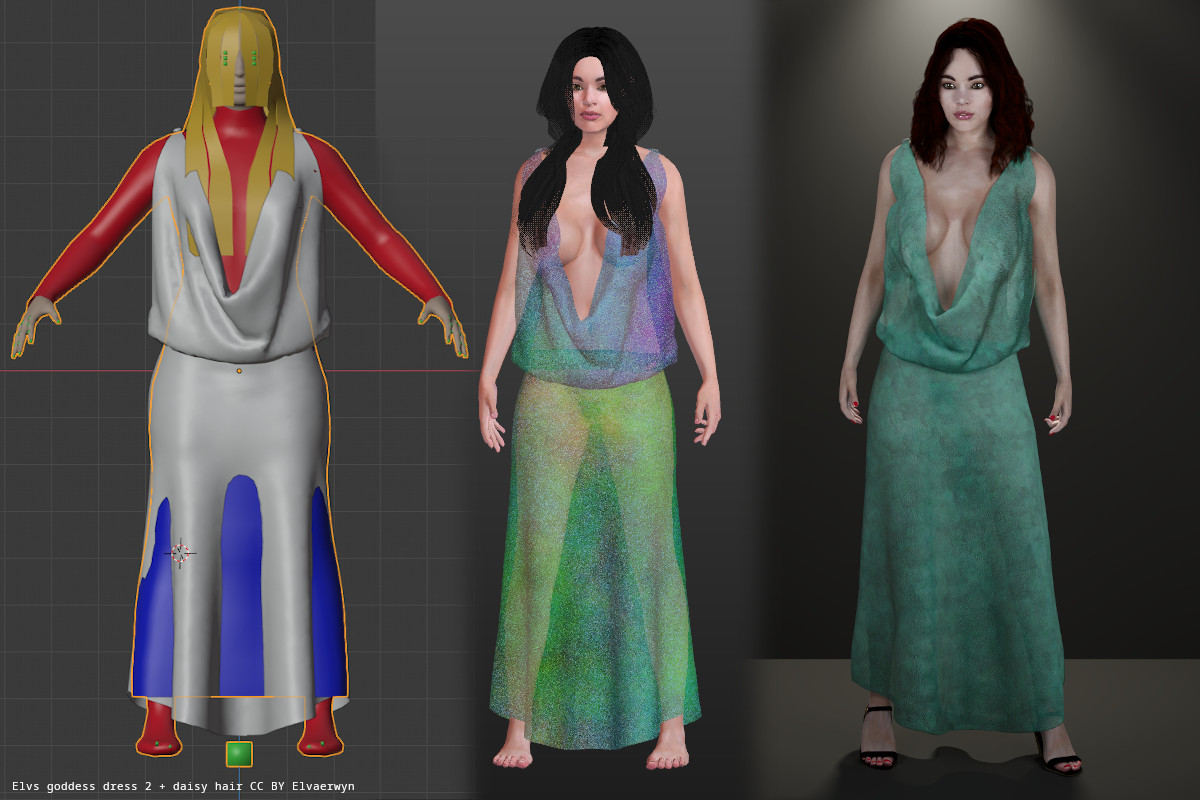
The material is also loaded, The illustration shows the result of the import of the “ww-corsage” on a female base-mesh. A material called “ww-corsage” was created in blender. All available information is imported and displayed. This includes the special parameters only used in MakeHuman (Shader, Backface culling, Transparent, AlphaToCoverage). So also the material setup could be used for a new item of clothing.